R2012 – Tom Glover
This category shows all Tom’s Blog posts related to Ravensboure2012

iPhone Streaming
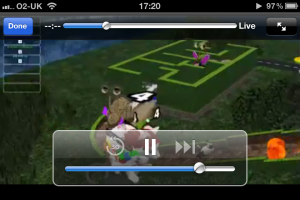
I’ve finally done it after two long days working with VLC and my Mac and iPhone I finally have a native live video stream to an iPhone.
I started by looking at this site which explained a way to stream to iOS devices using HTTPStreaming and in particular adaptive HTTP Streaming. This tutorial was however out of date, like many I had found either VLC was many version behind the current or the software used to segment the stream no longer existed.
Since version 1.2 (now in version 2.0.1) VLC has been able to create HLS live streams as part of its core streaming functionality, this function though I have found to be poorly documented as it is very similar to the standard progressiveHTTP Streaming module.
Stream Requirements
- A Video or Stream Source
- VLC – dummy or web interface
- A webserver, Apache or similar
You used to also require the mediastreamsegmentator from Apple, however a version of this software has now been written into the core of VLC after the Unwired Developer created a module for VLC back in early 2010 to help streamline the process, this module has since become core functionally of VLC.
The Working VLC Code
The code below is the final code that I used to start VLC into dummy mode from the command line, then transcode and re-stream the incoming stream or video file.
/Applications/VLC.app/Contents/MacOS/VLC -v -I "dummy" rtsp://media-us-2.soundreach.net/slcn_sports.sdp :sout="#transcode{vcodec=h264,vb=512, venc=x264{aud,profile=baseline,level=30,keyint=30,bframes=0,ref=1,nocabac},acodec=mp3,ab=96} :std{access=livehttp{seglen=10,delsegs=true,numsegs=5, index=/Applications/MAMP/htdocs/iPhone/stream.m3u8, index-url=stream-########.ts}, mux=ts{use-key-frames}, dst=/Applications/MAMP/htdocs/iPhone/stream-########.ts"
The first bold item is the incoming stream, for this I used a random RTSP stream I found online for testing, This can be replaced with a file that you wish to stream “as live”, there is also another option in this code to allow “On-Demand” videos to be created like this, but I will go into that another day.
The second bold (index=) item is telling VLC the file path of where it should store the “playlist”, the file that controls the stream, and the one you link to in the video players.
The third bold (index-url=) item is telling it how to link the .ts (Transport Stream) files in relation to the playlist file, in most cases these are stored in the same location, which means I only had to provide the file name of the stream files. The #### signifies a number which is auto generated by VLC with each file.
The fourth and final bold (dst=) item is telling VLC where to store the .ts files and what to call them, this is that system file path, similar to the index= above, including the filename.
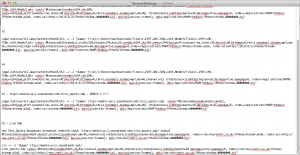
On the right you can see the many code variations I went through first to come up with the winning combo above. The above code still needs a few tweaks to find the optimised quality to bit rate, and also a few tweaks to the number of .ts files created. Each .ts file holds approx. 10 seconds of video, and after 5 have been created it deletes the oldest and replaces it with the next 10seconds of footage, this currently allows for 40seconds or so of rewind during a live show.
Distrubution
To distribute HLS or AdaptiveHTTP streams is quite simple, in its simplest form all you require is a web server (Apache, Nginx, IIS) and a webpage with the <video> tag.
Mime Types however are critical and are not set as standard for most web servers, these simple flags are enough to break a stream that is otherwise behaving perfectly. To find out more about mime’s have a look here: http://en.wikipedia.org/wiki/MIME
Configure the following MIME types for HTTP Live Streaming:
File Extension MIME Type .M3U8application/x-mpegURLorvnd.apple.mpegURL.tsvideo/MP2TIf your web server is constrained with respect to MIME types, you can serve files ending in
.m3uwith MIME typeaudio/mpegURLfor compatibility.
The above quote came direct from the apple HLS Developers Site here.
For Apache systems its as simple as creating a .htaccess in the site’s folder or editing the main httpd.conf with the following two lines:
AddType application/x-mpegURL    .m3u8
AddType video/MP2T    .ts
OR
AddType audio/mpegURL     .m3u
AddType video/MP2T    .ts
This then tell’s the client that the file is video and in a mpeg transport stream, which allows it to process it accordingly. Without one of these MIME flags being set, a .m3u8 file is classed as text/plain and all you load is a 10+ line document with reference links, no video.
Also without the MIME type’s being set you can end up with a black screen on the iPhone Safari, the only way to get out of this black screen is to fully exit Safari and then stop it before it loads or Exit Safari and stop the web server, this then forces an error on the iPhone and allows you to navigate the control’s again.
The Web Page
The webpage I used for this test was extremely simple, and included two lots of the <video> tag. The top set was a reference file that can be found on apple developer site, and the bottom one was the stream from my mac.
<html>
  <head>
    <title>HTTP Live Streaming Example</title>
  </head>
  <body>
    <video src="http://devimages.apple.com/iphone/samples/bipbop/bipbopall.m3u8" controls></video>
     <br/>
     <br/>
     <br/>
    <video src="http://10.0.0.3:8080/iPhone/stream.m3u8" controls> </video>
  </body>
</html>
The above code and system works flawlessly on an iOS 5.1.1 and OSx 10.7.3 (Safari 5.1.5).

Penrose Market Fly Away CAD
For the Penrose Market last week we had to create a complete studio in a Rack called a Fly Away. We had to create this Fly Away because the studio facilities at Ravensbourne were in use for another shoot on the same day.

This Fly Away was created using any available kit that we found on Level 9, then using the time in our 208 and 204 lectures to design and build the system with the help of James Uren and the rest of the BET Pathway. After an initial brain storm and specification we came up with a simple system that consisted of:
- 7 SD Cameras
- 1 VT Deck
- 1 16 Channel Vision Mixer
- 1 16×1 Router
- CTP and Jack Field
- 3 Digital DA’s – 1 Analogue DA in the Fly Away
- 8 Digital DA’s – 4 Digital to Analogue Converters in the Monitor Stack
- 10 Monitors
- 1 Large Engineering Monitor
- 1 Test Pattern Genorator
- 2 Wave Form Monitors
The initial brainstorm and scribbled drawing was then drawn up, neatly, onto a large A1 sheet of paper, along with a Cable Schedule and CTP / Jack Field layouts. This large Drawing was then attached to the side of the rack and used as a reference throughout the rest of the project.
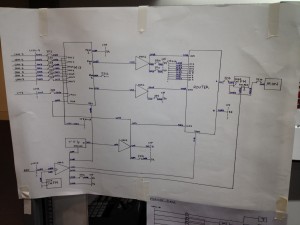
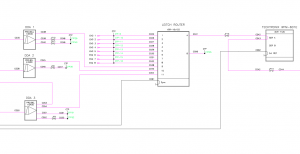
 After the project was completed on Tuesday (22/11/2011) we were required as part of our Hardware Systems unit (204) to draw up a full CAD in AutoCad based on the same layers and components that were used to create the CAD’s for the main system in Ravensbourne. This exercise was designed to teach us how to use CAD to create Technical Drawings as well as be confident in reading and updating existing drawings. A screen shot of mine can be found on the right, with a PDF copy of the final cad available for download below.
The technical drawing we had to create was in fact two drawings of two separate systems which interacted closely with each other. The first was the main Fly Away, which was a single rack with all the processing and routing required, and the second was of the Monitor Stack which was required to make the Rack work. This is a major problem with the system as it require one part to work to make the rest work, whilst also doubling the amount of video connections in and out of the rack. However these problems were only noticed after the initial and were not a problem in this project as the monitor stack and rack were being built side-by-side at the same time.
Having so many connection to and from the rack also opened up another problem, which could simply be caused by confusion during the connection of the rack to the video sources and the monitor stack. This confusion could lead to video being sent the wrong way into the system, which could cause damage to equipment, or for example a Camera could be fed into one of the ENG inputs, thus it would appear to work fine on the router but it would have completely bypassed the monitor stack and more importantly the Vision Mixer.
Above I talked about just a few of the problems with last weeks Fly Away, in time I may look into re-drawing the Technical Drawing to alleviate some of the faults mentioned, and when I have re-drawn a new version of the system I will post a comparison between the two.
Download an A1 PDF of my Technical Drawing Here.
Download a PDF copy of my Cable Schedule Here.
IP Stream: Hitting A Brick wall
0Today I’ve been working at trying to integrate the stream and its corresponding SDP file that Ravensbourne has kindly provided to me, this however hasn’t been as straight forward as i first believed it to be, my lack of knowledge of streaming also slowed this process down dramatically.
So to start with today I started with the obvious:
- The SDP file in a RTSP stream – Testsed using VLC and Quicktime prior to JW Player, to test it was still streaming.
- JW Player (Flash and HTML5)
- Some patience
Summary: Streaming Support
This table sums up support for the various streaming methods across devices and servers.
Devices Progressive Download RTMP/RTSP Streaming Adaptive HTTP Streaming Adobe Flash Player MP4, FLV RTMP HLS, Zeri, Smooth HTML5 (Safari & IE9) MP4 – – HTML5 (Firefox & Chrome) WebM – – iOS (iPad/iPhone) MP4 – HLS Android Devices MP4, WebM RTSP HLS (as of 3.0) CDNs (e.g. CloudFront) MP4, FLV, WebM RTMP HLS Web Servers (e.g. S3) MP4, FLV, WebM – HLS
As you can see the RTSP protocol is only supported by Android Devices, as well as many Software Based Media Players such as Quicktime, VLC and Windows Media Player. I haven’t tested iOS 5 with RTSP yet, it could possibly work, as iOS uses a stripped down version of Quicktime and Safari.
This leaves me with two options:
- Embed either Quicktime or other proprietary plugin as well as providing a direct link to the stream as a back up for users that don’t have or cannot download the plugin.
- Speak to IT about recreating the stream using a more compatible protocol such as HLS or RTMP.
Anyway thats enough for today, I will continue testing various protocols, as well as other players such as Quicktime, HTML5, Silverlight and any others I find.
IP Stream: Making Progress
Today we made some serious progress in creating an initial IP stream using a few odd bits of kit lying around room 906. The bodged system myself and Scott came up with consisted of:
- 1 x Cisco DME 1000 (Stream Encoding)
- 1 x Sound Desk (Tone Generation)
- 1 x Composite Signal Generator
- 1 x Picture Monitor (Live View)
- 2 x MacBook Pro Laptops (Stream ReEncoding and Viewing)


